
A Parent's Guide to Black and White Pictures for Newborns
Have you ever wondered why your newborn seems mesmerised by the stripes on your shirt or a simple, bold pattern? There’s a fascinating reason behind it. For the first few months of life, your baby’s world is a beautiful but blurry place. Their vision is one of the last senses to fully mature. This is why high contrast images play such a vital role in their early development.
Why Newborns See Best in Black and White
When a baby is born, their eyes and brain are still learning to work together. The cells in their retina that detect colour (cones) are still developing. However, the cells that process light and shadow (rods) are much more functional.
Here is why. Your newborn can easily pick out the strong, clear lines between black and white. They cannot yet distinguish between soft, subtle colours like pale pink and baby blue. It's a world of light and dark, not colour.
Giving your baby simple, bold black and white pictures offers some incredible developmental perks.
- Boosts Visual Development: These strong images send the clearest possible signals to your baby's brain. This helps strengthen their optic nerves and encourages their eyesight to develop.
- Encourages Cognitive Growth: Engaging with high contrast patterns helps to lengthen your baby’s attention span and improve their ability to focus.
- Strengthens Eye Muscles: As they track these interesting shapes, they are also building up the tiny muscles in their eyes. This is a skill they'll need for everything from coordination to reading later on.
Sometimes, these simple images can even have a calming effect on a fussy baby. They offer a simple, engaging distraction when they are feeling overwhelmed.
Your Baby’s Visual Journey
The sweet spot for using high contrast images is from birth to around four months. During this period, your baby’s ability to see and process the world around them is growing at an incredible pace.
A newborn’s ideal focus range is only about 20-30 centimetres from their face. That’s roughly the distance between your face and theirs during a feed, making it a perfect time for connection and visual stimulation.
This timeline shows the key milestones in your baby’s early visual development.
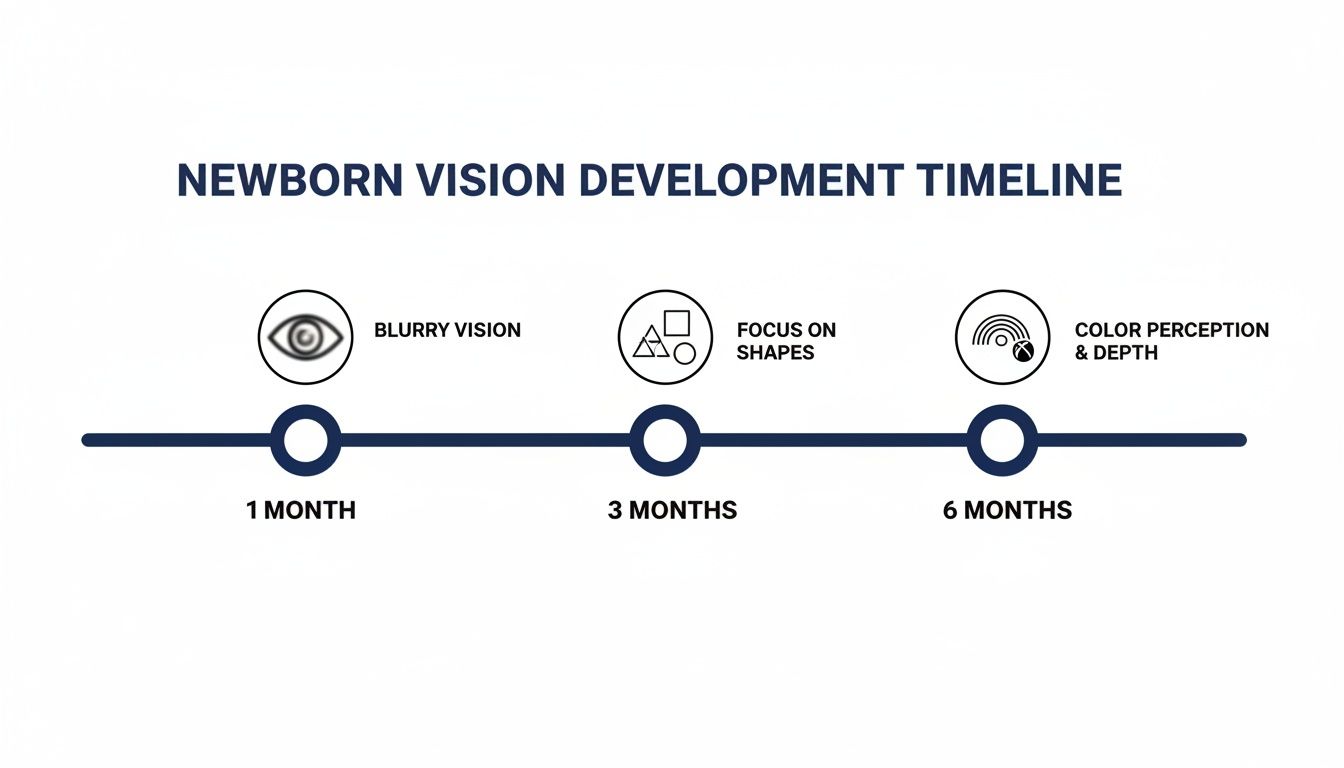
Here is a quick summary of key visual stages for newborns and how high contrast images support their development.
Newborn Visual Development Milestones
| Age Range | What Your Baby Can See | How Black and White Pictures Support Growth |
|---|---|---|
| 0-1 Month | A blurry world of light, shadow, and movement. Focus is limited to 20-30 cm away. | Simple, bold shapes and lines provide strong visual input that their developing brain can easily process. |
| 1-3 Months | Begins tracking moving objects and recognising simple patterns. Starts to see some primary colours, like red. | Tracking geometric patterns helps strengthen eye muscles and improves their ability to follow objects with their gaze. |
| 3-6 Months | Vision becomes clearer, depth perception improves, and most colours are now visible. | While colour vision is emerging, high contrast images still hold their attention and reinforce neural pathways. |
As the infographic and table show, your baby's vision progresses from a high contrast world to perceiving simple shapes and, eventually, the full spectrum of colour by about six months. Understanding this timeline helps you offer the right kind of stimulation at just the right time.
Choosing and Creating High Contrast Images
Now that you know why your baby is so mesmerised by bold patterns, you can start gathering the perfect black and white pictures for newborns. The good news is that you have plenty of options, from simple DIY projects to beautifully designed professional sets.
The key is to focus on what a newborn’s developing eyes can actually see. In these early weeks, simplicity is your best friend.
Let's break it down. Look for images with clear, uncomplicated designs. Your baby's brain is working incredibly hard to process visual information. Overly busy patterns can be overwhelming rather than stimulating.
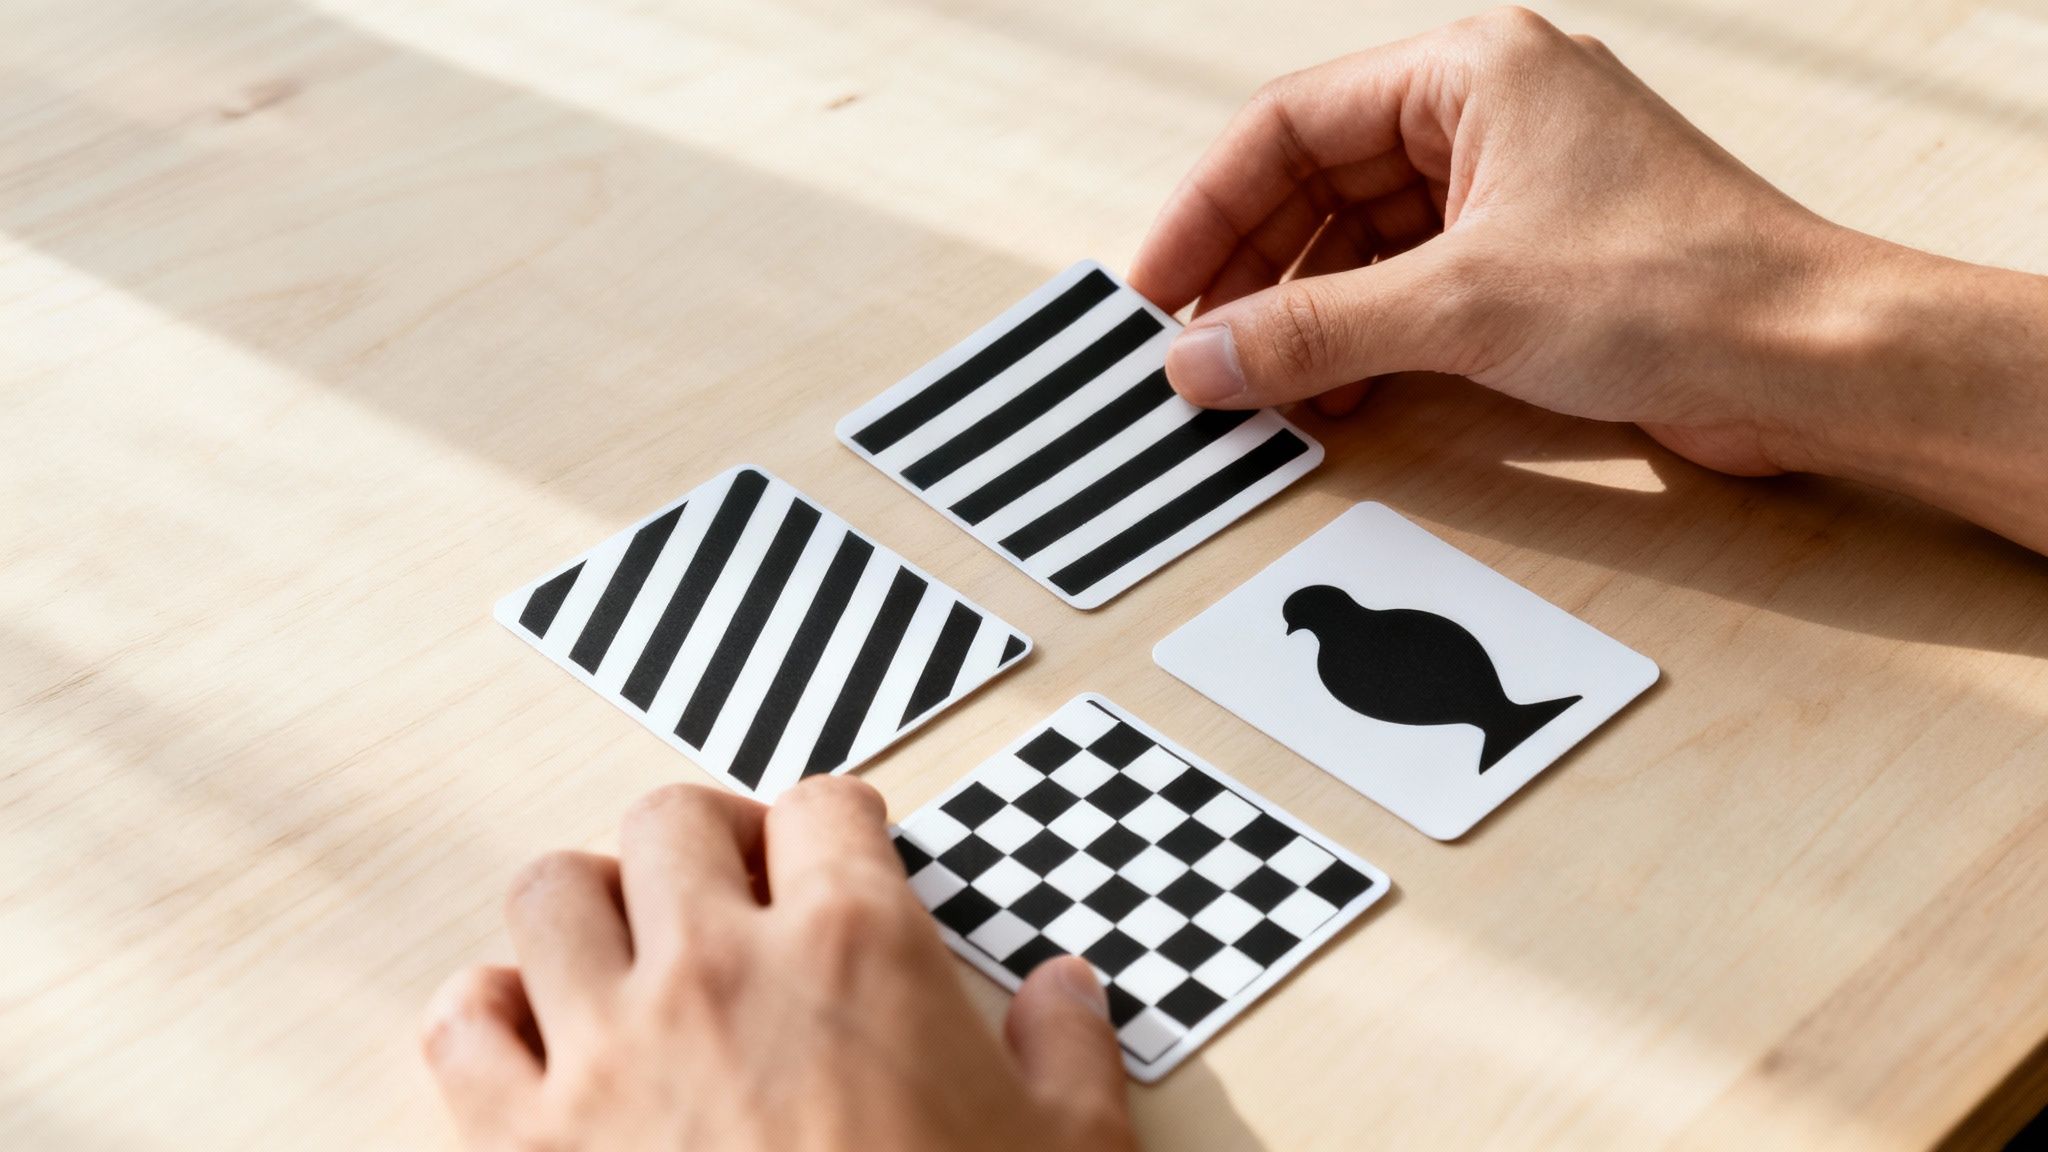
What Patterns Work Best
When picking out images, make clear lines and distinct shapes your priority. These are the easiest for your newborn to focus on and track with their gaze.
Here are a few designs that consistently capture a baby’s attention:
- Bold Stripes and Lines: Simple vertical or horizontal stripes are always a winner.
- Checkerboards and Grids: The alternating black and white squares create strong, defined edges that are easy to see.
- Simple Silhouettes: Outlines of familiar objects, like animals or stars, are excellent choices.
- Geometric Shapes: Think circles, squares, and triangles with thick, bold outlines.
Initially, it’s best to stick to these basic patterns. As your baby grows and their vision matures around the three-month mark, you can slowly introduce images with a bit more detail or even a splash of a primary colour like red.
Start with just one or two images at a time. This helps your baby focus without feeling overstimulated. Watch their cues. If they seem engaged, great! If they turn away, it’s just their way of saying they are ready for a break.
DIY and Photography Options
You absolutely do not need to spend a lot of money to create a visually rich environment for your baby. Making your own high contrast cards is a simple and rewarding little project.
For a quick DIY solution, grab a thick piece of white cardstock and a black permanent marker. Draw some of the simple patterns mentioned above, making sure your lines are thick and bold. A quick safety tip: always round the corners of any cards you make. If you are not feeling particularly artistic, a quick search online will give you countless free printable templates. You can also learn more about how to use baby high contrast cards to make your sessions effective and fun.
If you enjoy photography, you can create your own unique black and white pictures for newborns. Focus on capturing images with strong contrast between light and shadow. Think of the dark silhouette of a tree against a bright sky or the bold pattern on a piece of fabric. You do not even need a fancy camera; your smartphone can work wonderfully. The real trick is finding the right light. To get a better handle on creating stunning images, you can explore some essential lighting techniques for photography that can be applied to capture perfect high contrast shots.
Weaving Visual Play Into Your Daily Routine

So, you have got a beautiful set of high contrast images. Now for the fun part! The real magic happens when you weave them into your everyday moments. This turns simple routines into little bursts of developmental play. It’s all about making visual stimulation a natural and joyful part of your day together.
You do not need to schedule "lesson time" or get bogged down with a strict plan. Just look for those small windows of opportunity when your baby is calm, alert, and ready to connect. Moments right after a feed or a nappy change are often perfect for introducing black and white pictures for newborns.
Let's break down how to do it. By tucking visual play into things you are already doing, you are not just supporting key milestones. You are creating a sweet, interactive bonding experience. It feels less like a task and more like a shared discovery.
Making Tummy Time a Little More Engaging
Tummy time is one of the most important things for your baby’s physical development. But let's be honest, it’s not always their favourite activity. This is where high contrast cards can be a game changer. They give your baby a fascinating focal point, motivating them to lift their head and build that crucial neck and upper body strength.
Here’s why this simple addition makes such a difference:
- Encourages Head Lifting: Popping a card right in their line of sight gives them a genuine reason to push up and have a look.
- Promotes Head Turning: Arrange a few cards in a semi-circle on their soft play mat. This encourages them to look from one side to the other, strengthening both sides of their neck.
- Builds Core Strength: As they work to see the images, they are engaging their neck, shoulder, and upper back muscles. This is the very foundation for rolling and crawling.
To get started, place your baby on a comfortable, flat surface, like a linen play mat. Position one or two cards about 20-30 centimetres from their face. You can gently talk to them about the patterns, adding another lovely layer of sensory connection to the moment.
By turning tummy time into a mini art appreciation session, you make it more enjoyable for your baby. This positive association can help extend how long they are happy on their tummy. This maximises the physical benefits while stimulating their developing vision.
Creating Little Visual Nooks Around Your Home
Beyond tummy time, you can create stimulating visual environments throughout your home. The goal is to place images where your baby will naturally see them during the day. This turns ordinary spaces into moments of quiet discovery.
Think about creating a baby level "art gallery" in their nursery or play space. You could securely tape a few cards to the wall near the change table or on the side of their bassinet (always on the outside, well out of reach). This gives them something interesting to focus on while you are changing a nappy or getting them dressed.
Another wonderful idea is a simple DIY mobile. Just punch a hole in the top of several cards, tie them with ribbon to a wooden hoop, and hang it securely over their play area. Just remember, never over the cot where they sleep. The gentle movement will capture their attention and help them practise tracking objects with their eyes.
This idea of creating beautiful, stimulating environments for our little ones is becoming more and more popular. In fact, the Australian photography services market, which often embraces that classic black and white style in newborn sessions, is set to grow significantly. This shows how much parents value creating visually appealing and meaningful experiences right from the very beginning. You can see more data on the Australia Photography Services Market from Spherical Insights.
Next steps include making these cards a part of your one-on-one play. You can hold them and move them slowly for your baby to follow with their gaze.
Styling a Timeless Nursery with Monochrome Art

Beyond their developmental perks, black and white pictures for newborns are a classic, sophisticated choice for nursery décor. A monochrome theme creates a calming, timeless space that feels both modern and gentle. It helps you steer clear of fleeting trends you might quickly outgrow.
This elegant style works beautifully with the soft, neutral colour palettes so popular in Australian homes. Picture clean lines, natural wood tones, and soft textures, all brought to life by the simple, emotional power of black and white art. It’s a look that grows with your child, transitioning easily from a peaceful nursery to a stylish kid's room.
Let's break down how you can bring this look into your own space.
Creating a Cohesive Look
A monochrome palette is the perfect foundation for a serene nursery. It pairs beautifully with natural materials and creates a room that feels uncluttered and peaceful. The key is to balance the bold contrast of black and white with softer elements to keep it feeling warm and inviting.
Here are a few ideas to get you started:
- Complement with Natural Textures: Think woven baskets, timber furniture, and soft linen. These elements add warmth and stop the room from feeling stark.
- Layer Different Shades: You can bring in various tones of grey and off-white to add depth and softness to the overall design.
- Choose a Focal Point: Decide if you want a striking gallery wall above the change table or a single, large-scale portrait over the cot to act as a statement piece.
This approach ensures the room feels thoughtful and curated, not just thrown together.
A thoughtfully styled nursery does more than just look good. It creates a tranquil environment for both you and your baby. The simplicity of a monochrome theme reduces visual clutter, which can help promote a sense of calm and restfulness during those precious early months.
Displaying Your Monochrome Art
How you frame and arrange your pictures is just as important as the images themselves. For a modern, gallery style look, try using identical slim frames in black, white, or a natural wood finish. This creates a really polished and unified display.
If you prefer a more relaxed, eclectic vibe, mix and match different frame sizes and styles. A great tip is to lay out your arrangement on the floor first to get the spacing just right before hanging anything on the wall. For more comprehensive guidance on creating a safe, sleep friendly, and stylish room, it's also worth exploring the best window treatments for a nursery to complement your décor.
Australian photographers have mastered capturing newborns in this timeless style. These professional portraits pair perfectly with OEKO-TEX certified linen play mats for a seamless nursery vibe.
Keeping Your Baby Safe Around Pictures and Decor
Creating a visually engaging space for your baby is such an exciting part of the journey. But their safety always, always comes first. As you start decorating with black and white pictures for newborns, it’s crucial to make sure every single item is secure and baby proof.
The goal is to create a nursery that’s both stimulating and a complete safe haven. This means thinking about everything, from the materials you choose to exactly how and where you display your beautiful new decor.
Let’s walk through the key safety checks for pictures and other visual aids you might use in the nursery or play areas. These simple steps will give you peace of mind that your beautiful space is also a secure one for your curious little one.
Choosing Safe Materials
If you are getting crafty and making your own stimulation cards, the materials you pick really matter. Always opt for non-toxic supplies for everything, from the cardstock right down to the markers you use. Babies explore the world with their mouths, so anything that could end up there must be completely safe.
For printed or store-bought cards, look for options that are:
- Durable and Chew Proof: Laminated cards or those made from thick, sturdy board are definitely the way to go.
- Easy to Clean: A surface you can wipe down is a must for hygiene. You can easily laminate your DIY cards at home to make them drool proof and simple to sanitise.
- Rounded Corners: Sharp corners can be a hazard for delicate baby skin. Always make sure to trim the corners of any homemade cards.
A great little tip for framed pictures: choose shatterproof acrylic instead of glass. It gives you the same clear, protective finish but completely removes the risk of dangerous breakage if a frame were to ever fall.
Secure Display and Placement
How you secure your decor is probably the most critical safety step of all. Everything you hang must be positioned well out of your baby's reach. And remember to account for when they start to stand, pull up, and climb.
A good rule of thumb is to keep all wall art away from the cot. Mobiles are wonderful over a play area, but not a sleep space. They should be removed once your baby can push up on their hands and knees. Check out our guide on finding the best baby play mat in Australia to create that perfect, safe zone for floor time.
For any framed art, use proper wall anchors and hooks that are specifically designed to hold the frame's weight securely. It's also a good idea to regularly check that everything is still firmly attached to the wall. This diligence is more important than ever. In 2023, Australia saw 300,684 registered births. This highlights a growing need for safe and beautiful baby products. You can learn more about Australia's latest birth statistics from the Australian Bureau of Statistics.
Source: Births, Australia. Australian Bureau of Statistics. 13 February 2024.
Got questions about high contrast images? That’s completely normal. This whole journey is full of new experiences. You want to feel sure you are doing the best for your baby’s development.
Let's dive into some of the most common questions we hear from Aussie parents. Getting the practical side sorted helps you make visual stimulation a seamless, enjoyable part of your routine.
When Is the Best Time to Introduce Black and White Pictures?
The ideal time is right from birth. Seriously, from day one. A newborn’s vision is perfectly tuned for high contrast images because their ability to see colour hasn’t fully kicked in yet.
You will find these simple black and white patterns are most powerful during the first four months. Their sweet spot for focus is only about 20-30 centimetres away. This is roughly the distance from their face to yours when you are holding them for a cuddle.
As they get closer to five or six months, their colour perception will start to pop. That’s a great time to begin introducing more vibrant toys and books.
How Long Should My Baby Look at the Cards Each Day?
There's no strict rule here, which is a relief, right? The best approach is simply to follow your baby’s cues. Start with very short sessions, just a few minutes at a time, a couple of times a day.
The perfect moment is when your baby is calm, fed, and alert, that happy little window of contentment. Hold a card about 20-30 cm away from their face and just watch what they do.
If they seem engaged and interested, that’s wonderful. If they start getting fussy or look away, it’s just their way of saying, "I've had enough for now."
The goal is always positive, gentle engagement, never a scheduled chore. It’s all about creating small, joyful moments of connection and discovery together.
Is It Okay to Make My Own Stimulation Cards?
Absolutely! Making your own cards is a fantastic and budget friendly option. It’s also a lovely way to create something personal for your baby while you are nesting.
All you need is some thick white card and a black marker. Think simple patterns like bold stripes, spirals, or basic geometric shapes. You can also find heaps of free, printable templates online if you are not feeling arty.
For safety and durability, here are a few simple tips:
- Round the corners to avoid any accidental pokes during playtime.
- Consider laminating the cards to make them durable and easy to wipe clean (because, you know, babies).
- Use non-toxic markers and materials, since pretty much everything ends up in their mouths at some point.
How Do Black and White Pictures Help With Tummy Time?
These pictures are a game changer for making tummy time more enjoyable. Let's be honest, many newborns find tummy time a bit of a challenge at first. So a little motivation goes a long way.
Placing a few interesting black and white pictures in their line of sight gives them something captivating to focus on. This encourages them to lift and turn their head, which is a fantastic little workout for them.
This simple activity strengthens their neck, shoulder, and back muscles. These are all crucial for hitting those big milestones like rolling over and crawling. Try setting up a few cards in an arc on their play mat to get them looking from side to side.
At Wallaby Collective, we believe in creating beautiful, safe, and stimulating spaces for your little one to thrive. Our OEKO-TEX certified linen play mats provide the perfect soft, neutral foundation for tummy time and visual play. Explore our collection to find a timeless piece for your nursery. Discover the perfect play mat at https://wallabycollective.com.